How to soundproof a room (5 big mistakes to avoid)
If you’re looking to soundproof a room, then you need to start at the beginning and be sure not to cut corners. Using the right materials for the job really will make the world of difference with soundproofing. The most common mistakes made when soundproofing a room are:
- Using the wrong materials (get advice)
- Soundproofing a ceiling instead of the floor (why is this important?)
- Using resilient bars (what are these?)
- Ignoring flanking transmission (what is this?)
- Failing to undertake simple preparatory work (your checklist)
Get everything sorted by using an installer

Using the wrong materials to soundproof a room
This is a really common mistake people make when they soundproof a room and it can be easily avoided. A lot of people do a little research and pick the cheapest product for the job, an understandable choice, however this is very unlikely to make any difference to your room. We see a lot of people just pick up a roll of Tecsound to slap onto a wall and hope for the best, but what they should have done is use a system.
The reason you should use a soundproofing system in your room is that there are different types of noise and these have to be deflected in different ways. A system incorporates a variety of materials, each with a valuable soundproofing property, that can come together to create a genuinely quieter space. Luckily, a soundproofing system doesn’t have to cost the earth and the little extra you’ll spend will take you from a single, somewhat lackluster, roll of Tecsound, to a room that is quieter and usable.
Soundproofing materials for noisy neighbours
- Use materials of high mass
- Use materials of different mass layered together
- Fill any cavities to prevent reverb
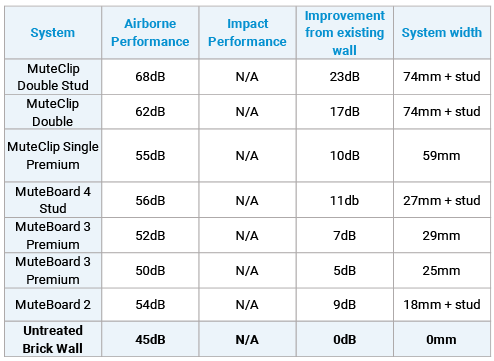
Airborne noise, as the name suggests, is sound that uses the medium of air to travel through. You’re going to be hearing this as things like people laughing, music playing or a TV and it’s a common issue that people have with party walls and noisy neighbours (read more about party walls here).
The best way to tackle airborne noise is with materials of high mass as these are able to reflect airborne soundwaves and prevent them entering your room. You’ll see our soundproofing systems use more than one layer of high mass and this is because different levels of mass can reflect different frequencies of sound. So, by using a wider range of materials that have different masses, we are going to be able to provide a more complete protection against airborne noise. Again, this is why you should use a system and not a single sheet – it can’t deliver the results you need!
Pre-made materials to resist airborne noise
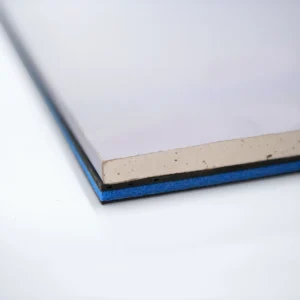
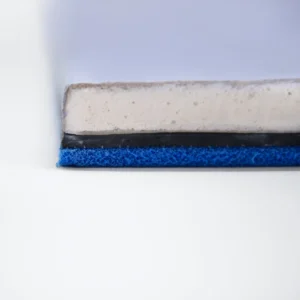
To make life easier for you, we have a selection of ‘MuteBoards’. Muteboards are single panels that are created by adhering a combination of soundproofing materials to acoustic plasterboard. Acoustic plasterboard alone has good soundproofing capabilities, however, in order to get a well rounded solution, you’re going to need extra layers.
By creating exactly what you need in one simple panel, your installation process is far easier and faster. You can also feel confident knowing that you have a soundproofing panel designed by our team of specialists! These MuteBoards can be installed as a stand alone solution, but again we would suggest using them as part of a system, which we will show you more about below.
What is MuteBoard 4?
Top Features
- Airborne resistance of up to 49dB
- Can be used as a direct to wall solution
- For stud or brick
- 4 different layers of soundproofing materials
- Can be used in systems
MuteBoard 4 is an iKoustic made specialist acoustic panel and our top performing single soundproofing board. It’s made of 4 layers, (hence the name), that come together to provide excellent airborne sound resistance and some absorption of vibration energy, too.
MuteBoard 4 is made of
- Layer of acoustic plasterboard
- Layer of mass loaded vinyl
- Layer of closed cell foam (absorption)
- Layer of mass loaded vinyl – with a different mass to the first
MuteBoard 4 can be installed on it’s own as a direct to wall solution to soundproof a room, or, it can be used as part of a system by incorporating acoustic mineral wool, for example. MuteBoard 4 achieves an airborne resistance rating of up to 49dB on a single-course brick wall.
What is MuteBoard 3?
Top Features
- Airborne resistance of up to 45dB
- Can be used as a direct to wall solution
- For stud or brick
- 3 different layers of soundproofing materials
- Can be used in systems
MuteBoard 3 is a slightly lighter soundproofing panel as it has one fewer layers of mass loaded vinyl. This panel can be used direct to wall or as part of a system. We would recommended, when you soundproof a room, to use the MuteBoard 3 as part of a system because it will perform much better for you.
MuteBoard 3 is made of
- Layer of acoustic plasterboard
- Layer of mass loaded vinyl
- Layer of closed cell foam
What is MuteBoard 2?
Top Features
- Can be used with acoustic mineral insulation
- For stud or brick
- 2 different layers of soundproofing materials
- Slim-line at only 19mm thick
- Used in systems
MuteBoard 2 is made of
- A layer of Tecsound
- A layer of acoustic plasterboard
MuteBoard two is our slimmest soundproofing MuteBoard panel at only 19mm thick. This is worth considering when you have a small room to soundproof and are struggling for space. The MuteBoard 2 should be used as part of a system to attain the best results. To soundproof a room with MuteBoard 2 it would be advised to fill stud cavities with some acoustic mineral wool.
Soundproof a room with a system
You might have realised by now that a soundproofing system is going to perform better than a single soundproofing panel of acoustic plasterboard. Our MuteBoards help to simplify system installation, and design, by already massing several different materials into one. But how do you know which system to pick?
Get the right system easily, by speaking to our technical support team
Soundproof a room with MuteBoard 4 System
This system uses our MuteBoard 4 plus acoustic mineral wool and a stud frame to soundproof a room. It can be used on a stud wall as well as a brick wall (with a stud frame erected in front). The video above shows how this system comes together to soundproof a room. The acoustic mineral wool helps to absorb vibrations that travel through a building, such as footstep thuds and washing machine rattling.
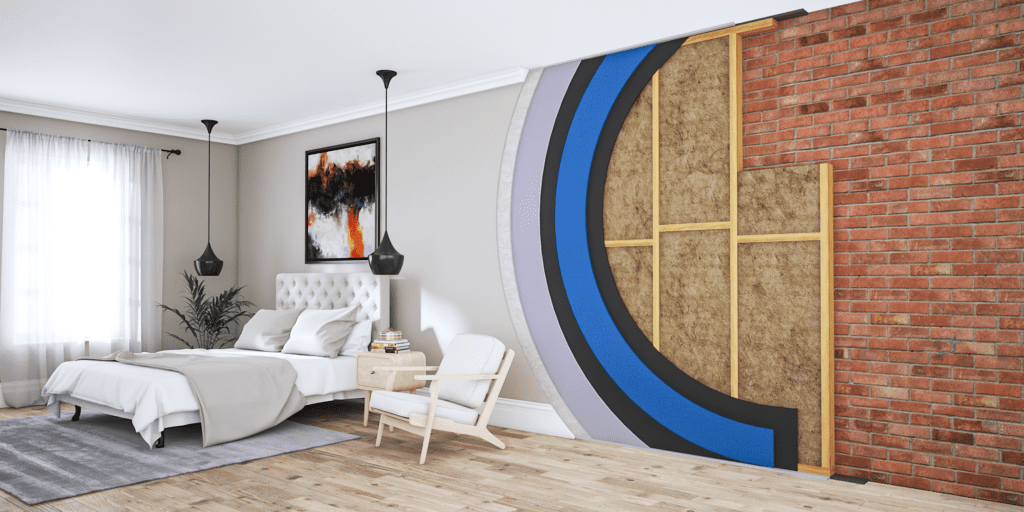
MuteBoard 3 can be attached directly to the wall without a stud frame, although we would advise upgrading to the MuteBoard 3 Premium system. This system includes an extra layer of visco-elastic membrane which is good for extra airborne sound reflection as well as sound absorption.
How to use isolation clips to soundproof a room
Ultimately, the best wall soundproofing materials you can include when you soundproof a room would be isolation clips. These are incredibly effective for the space that they take up and will make the biggest difference to your wall.
An isolation clip is a piece of technology that uses vibration resistant materials, (such as silicone), along with steel to hold a new wall away from the existing one. This is done to decouple structures that would otherwise be able to transfer sound vibration energy easily from one room into the next.
At iKoustic, we have designed an isolation clip that uses not one, but two different densities of silicone that can help to resistit a wider range of soundwaves. The MuteClip comes in different forms (more on that later!) making it versatile and easy to install.
Into the clip you place a MuteClip Channel that will support the soundproofing panels. This clip and channel system is the best way to decouple structures and reduce the transference of impact noise through a structure. If you decided to soundproof a room using a clip and channel for the walls, ceilings and a floating floor, then you’ll have the ‘room within a room’ solution!
Clip and channel systems to soundproof a room
We have quite an extensive range of soundproofing systems which use the MuteClip and channel and these are available for brick and stud. Below, we will list our top systems but if you’re trying to decide which is the best for your room, then do get in touch with us for a quick answer.
MuteClip Double Stud
- Our best sound reduction system
- For use on a brick wall
- 5 layers of soundproofing
If you have a really persistent noise issue then the MuteClip Double stud to brick wall is going to be the best solution for your space. It involves erecting an independent stud wall in front of an existing brick wall and resting the new partition on isolation strips.
We then attached the MuteClip system to this which decouples the new partition that can then be finished with three layers of soundproofing panels.
MuteClip Double Stud System
MuteClip Single Premium
- Most slim-line option for MuteClip
- For use on a brick wall
- 4 layers of soundproofing
When you haven’t got a lot of space but need a good soundproofing result, we would suggest using the MuteClip as a direct to wall option. This means no stud wall, but, you still benefit from a decoupled system and acoustic mineral wool.
The MuteClip and channel is straightforward to install, but if you aren’t someone who loves a bit of DIY at the weekend then take advantage of the installer network to have it done for you.
MuteClip Single Premium System
MuteClip Single Premium
- Best reduction for stud walls
- Can be used on existing stud wall
- 5 layers of soundproofing
This is a great way to soundproof a room with existing stud walls and still return a brilliant sound reduction. If you want to, you could also build a second stud frame in front of the first, but of course this will add to the width of the system.
When the final layer of acoustic plasterboard has been added, scrim tape is stuck over the seams and it is then ready for skim plaster and painting.
Soundproof a ceiling or the floor?
It is always best to soundproof at the source of the noise whenever possible. This means that if you have access to the floor, soundproofing this would be the preference over soundproofing the ceiling if you are experiencing impact noise from above. If you are trying to stop noise from below coming up through the floor, then you might want to soundproof the ceiling instead though.
| Type of Noise | Concrete Ceiling | Wood Ceiling |
|---|---|---|
| Impact | Soundproof the floor | Soundproof the floor |
| Airborne from below | Soundproof the ceiling | Soundproof floor or ceiling |
Why soundproofing a wooden floor is better for airborne than a concrete ceiling
Because a wooden ceiling has joists, the ceiling soundproofing system can incorporate acoustic mineral wool which is incredibly effective against airborne noise. The gaps between joists are packed with acoustic mineral wool which is able to damp airborne sound. However, with a concrete ceiling, it is a solid piece of material without cavities to install acoustic mineral wool. That said, concrete already has good airborne resistant qualities so it is better to treat the noise at the source, (i.e the ceiling).
Our floor soundproofing systems are extensive, so if you’re feeling slightly overwhelmed do remember that we have our technical team on hand and ready to help make the process easier for you.
Soundproof a room – best wooden floor solution
If you have a wooden joisted floor, then we have two top solutions for you. One is lightly more budget friendly and the other is a top performing, let’s take a look at them…
MuteMat 3 – Standard, Premium or Premium Plus!
- Reduce impact noise
- Reduce airnorne noise from below
- 3 upgrdae options
- Impact improvement up to 49dB
- Airborne improvement up to 51dB

Our first option is technically three options depending on the grade you decide to opt for. This system uses our MuteMat range which is similar to the MuteBoard range and is a compliation of different soundproofing materials adhered into one sheet. Again, this makes installing your soundproofing far easier and faster.
The MuteMat 3 is often used to soundproof a room as it covers both impact and airborne noise. The standard MuteMat 3 system packs the wooden joists with acoustic mineral wool and is topped with chip board and MuteMat 3. This will reduce the impact noise heard from below and reduce the airborne noise floating up through the floor, too.
Do I need the isolation stud strips?
Yes! The rubber isolation strips are incredibly important and, as small as they are, they will make a noticable difference to the performance of your systems. A little like the MuteClips, isolation strips help to decouple the new soundproofed flooring layer as they are non-resonant. This will reduce the transference of impact vibrations through the structure.
Soundproof a room – budget option for wooden floor
MuteMat 2 – Standard, Premium or Premium Plus!
- Reduce impact noise
- 3 upgrdae options
- Impact improvement up to 49dB
- Airborne improvement up to 50dB
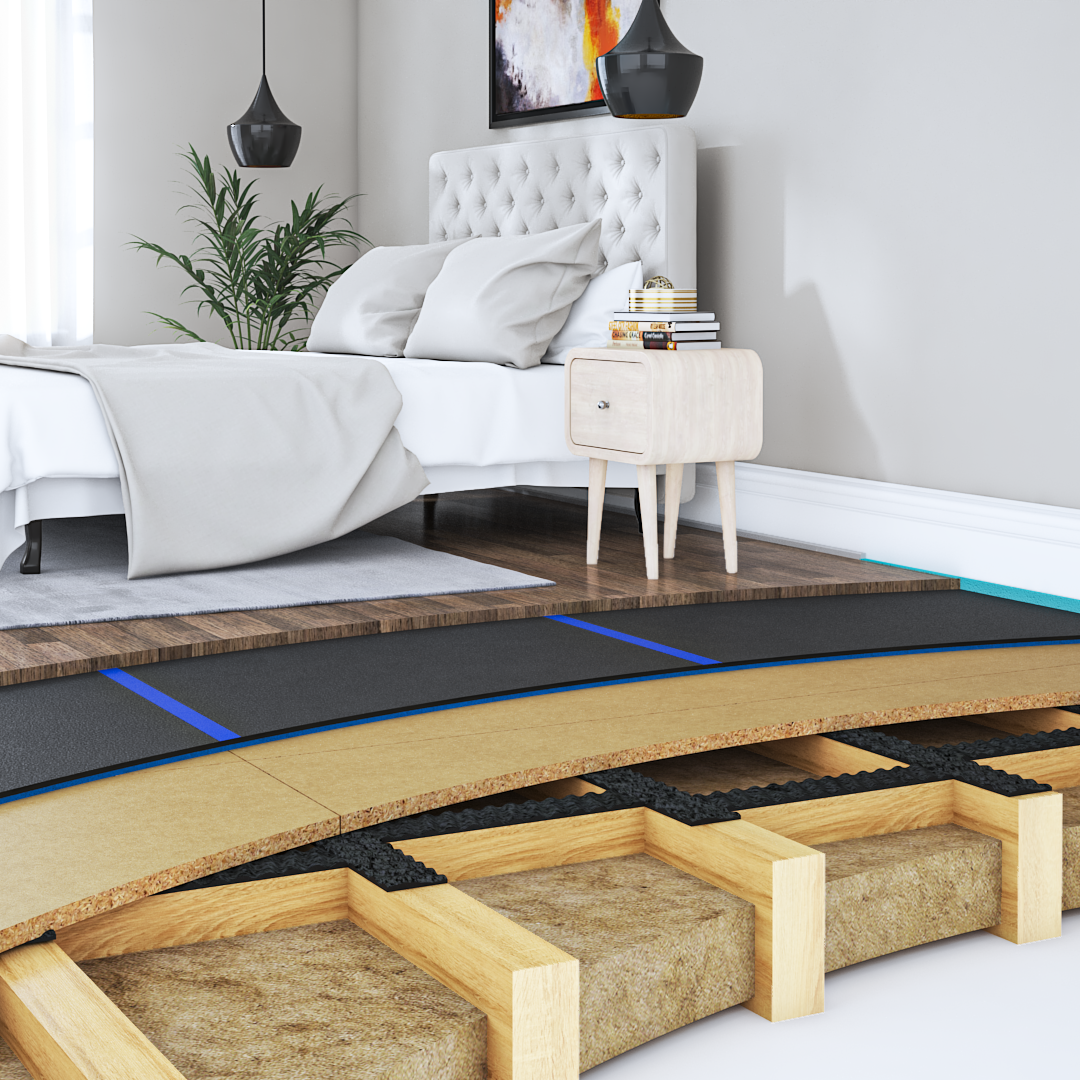
If you want to save a little cash and don’t need quite as much airborne resistance, then the MuteMat 2 is a good option. This system has one fewer layers of mass loaded vinyl in the MuteMat but still uses acoustic mineral wool.
Soundproofing for laminate flooring
If you have laminate wood flooring to lay over the MuteMat 3 or MuteMat 2 systems, then you’ll need to add a 6mm layer of plywood over this. This will add a little extra expense, however to ensure the laminate is properly supported this step is essential! If you are laying carpet over then you can go right ahead without any 6mm ply.
How to soundproof a concrete floor for impact
For a concrete floor, as we have already seen, you are best soundproofing the ceiling below if airborne noise is the major issue here. However, if you are looking to improve the absorption of impact sound, then this can be easily improved! Yet again, we have a variety of options for you depending on your budget and wider requirements.
You won’t find MuteMat 3 in the system selection for concrete as the airborne performance of concrete is already so good that MuteMat will give a similar performance for less cost. Once again, there are options to upgrade a MuteMat system by adding in a layer of visco-elastic Tecsound which is a great material for dispersing impact vibrations.
The MuteMat OSF range is made from a rubber crumb which is 100% recycled and incredibly durable. This material is easily installed beneath your chosen flooring. Once again, for a laminate finish you’ll need to addition of a 6mm plywood layer for support.
Soundproofing Under Screed
Some people who soundproof a room will be looking at an empty shell ina new build and might have the opportunity to add an under screen to the floor. This is a layer of rubber crumb matting that is placed down before a top concrete screen is laid down. This improves the flex of the concrete so that it is able to absorb some of the impact vibrations instead of being a totally rigid layer – good for airborne but not so much for impact!
Some people even lay down a concrete screed as part of a DIY soundproofed room. We don’t give guidance on that here, however you can find some greta videos on YouTube. Remember that if you need someone to come in to soundproof a room, we have a whole installer network ready to help you out.
Floating floor soundproofing – best for airborne
If you have a concrete floor and are experiencing airborne noise from below, then first see if you can soundproof that ceiling. If this isn’t possible however, then you’ll need to add a floating floor. This will reduce the height of your room but give you the results you’re after, too!
To soundproof a room with a floating floor system, you’ll need to install the MuteCradle. The video below shows you how this system goes together but in essence it’s a similar idea to the MuteClip. Each cradle is backed with non-resonant rubber that can resist sound vibrations. These then support new wooden struts that your flooring is laid over the top of.
Soundproof a room with a ceiling system
We have more detailed posts on soundproofing a ceiling butto understand how to soundproof a room we will explain the differences in isolation clips for ceilings. As we saw earlier, we have the standard MuteClip which can be used on walls but this can also be used on the ceiling. However, for some situations, you might need a different design for a better install.
MuteClip (standard)
- Works for walls and ceilings
- Installed on the bottom of the ceiling joists
- Works for concrete and wood ceilings

MuteClip LP (low profile)
- Works for ceilings
- Low profile to save space
- Installed on the inside of the ceiling joists
- Works for wooden joisted ceilings

MuteClip XP (extra profile)
- Works for ceilings
- Extended profile to drop ceiling
- Used on uneven joists to level ceiling
- Works for wooden joisted ceilings

Avoid using resilient bars
Resilient bars are like the forefather of isolation clips and whilst they have been popular, isolation clips were designed to solve problems that the resilient bar system created. Resilient bars work along the same principles of MuteClips in that they both aim to decouple the new soundproofing partition by creating a semi flexible structure to which the panels are screwed into.

The difference is that resilient bars are all one component, which is one piece of metal bent into a U shape. This shape allows for the flex and absorption of sound waves. However, the flex can also lead to sagging over time which then renders the whole system caput. As the bars sag over time, the acoustic boards attached to it come into contact and then rest upon the floor – not allowing for any flex.
Resilient bars can also be difficult to install correctly, which can mean that the systems never works as it’s supposed to. These issues were addressed in the design of the MuteClip and this is why we, at iKoustic, no longer sell or recommend resilient bars in systems.
What is flanking transmission?
Flanking transmission is when sound uses other routes to gain entry into a space. This might mean travelling through an electric socket box instead of the wall, or, vibrating along pipe work. In other words, the sound can travel through other paths which have not be soundproofed and have a big impact on the effectiveness of your new room. When you soundproof a room, you must first start by looking for the weak areas.
This video shows the other ways in which sound has managed to travel around the soundproofed wall. While it might seem a little dramatic, these small areas of relatively little resistance can make themselves heard! If you consider the difference made by having a window open wide, to open a crack to fully shut makes, you can better understand how these small weaknesses will impact your room.
The good news is, that to soundproof a room and avoid flanking transmission issues, there are some simple fixes! Firstly, go around and fill crack or holes in the surfaces. This can be done with a regular filler and then sanded back. Next, consider your socket placement as electric sockets are a common issue when you soundproof a room. These can be overcome in two ways, firstly avoid placing sockets back to back on a wall as this makes an even thinner partition. Secondly, install socket inserts that help to damp sound vibrations. You can do the same for light fittings with down light covers, which are also fire resistant.
For pipe work, we can also offer a specialised insulative wrap that is quick and easy to install when you have access to the pipe work. This pipe wrap will minimise the transference of vibrations into the frame of your building and prevent your soundproofing work being shortcurcited!
How to soundproof a room correctly
Lastly, although arguably this is the first thing to do when you soundproof a room, consult a checklist. As we have just seen with flanking transmission, there are tasks that can be easily completed ahead of the installation. To make it easy for you, we have a simple checklist of tasks to complete ahead of starting the really messy work. Most of this can be done as DIY to save on budget if it helps.
Soundproof a room easily
The simplest way to soundproof a room and get your project moving is to take accurate measurements of your space and give us a call. The Technical teams here are experts at what they do and will be able to advise on the most appropriate system for the job. We take you all of your requirements into account, including your budget restrictions, and will help you create the space you need.
To book in a phone consultation, send us an email or speak to us today, simply head over to our contact page and get your soundproofing project rolling!


