How to Soundproof a Ceiling
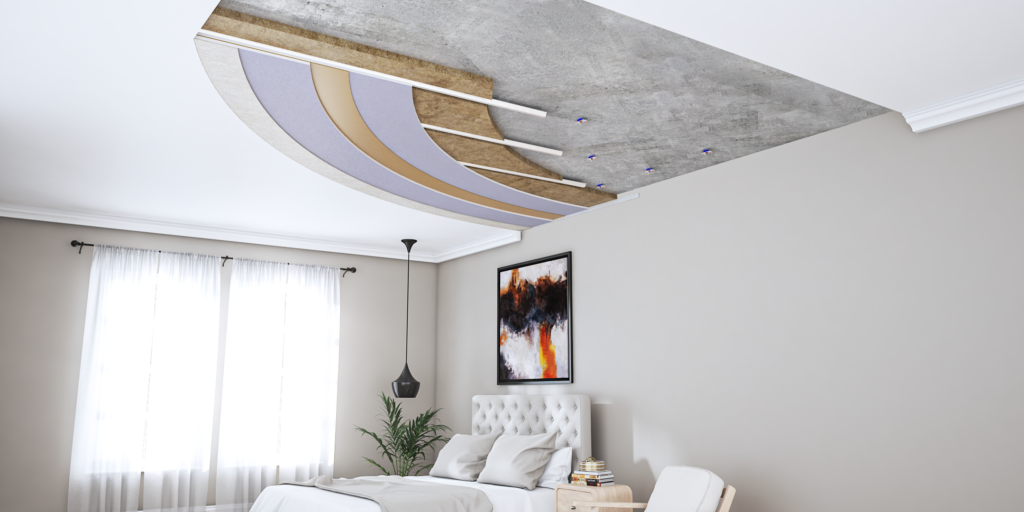
To soundproof a ceiling, you need to increase the mass, decouple structures and include acoustic insulation in cavities. These three core components of soundproofing will give you the best reduction in sound transmission.
Before you begin soundproofing your ceiling, there are some key questions to answer. We will show you how to soundproof a ceiling for each instance below and the best options.
- Are you reducing airborne noise (talking/music) or impact?
- What is your current ceiling made of?
- How much head height can you lose?
- Do you have access to the floor above?
- Do you have uneven beams, or need space for pipes, or, wires?
How to soundproof a ceiling from airborne noise
To soundproof your ceiling from airborne noise, like talking, use soundproofing panels to add mass and a MuteClip frame to decouple the ceiling. Soundproofing from airborne transmission means a room must be insulated to prevent sound from getting in or out.
High-mass materials reflect airborne noises that don’t have enough energy to move through them, and this insulates the room from sound. For very loud noises, a decoupling device needs to be used. Decoupling means surfaces are separated and sound cannot easily transfer from one material directly into the next.
The best solution for this is the MuteClip Gold, as it decouples the ceiling, adds mass and also uses acoustic insulation in the cavities.
How to soundproof a ceiling from impact noise
To soundproof a ceiling from impact noise, joist cavities need to be filled with acoustic mineral wool and a decoupling frame created. Ideally, impact noise should be soundproofed at the source. So you should soundproof the floor above if you have access to it.
Soundproofing a ceiling from impact noise requires the highest level of soundproofing as the vibrations have already entered the structure of the building, so they are harder to control. Acoustic mineral wool will help to dampen vibrations close to the source and provide the first layer of defense.
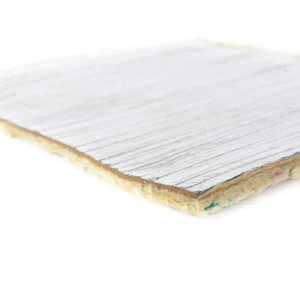
MuteClips will work like mini shock absorbers between the original ceiling and your new soundproofing ceiling, these are the most important component. A visco-elastic membrane between the soundproofing panels is the last vibration isolation layer and will dissipate vibration energy. This means the final layer in the system, soundproof plasterboard, will receive the least vibrations and less sound is radiated into your room.
How to soundproof a timber ceiling
To soundproof a timber beam ceiling, it is best to use a MuteClip system and you will need to remove the original ceiling. Our bronze ceiling soundproofing system is good for airborne noise. The silver and gold systems will further protect your from airborne noises but also from impact sounds.
Consider how much space you are able to lose first, as this may dictate the type of system you can install. We also have clever low profile MuteClips which make the systems even slimmer! Read about the low profile options a bit further down.
Bronze system
Double
Board Bronze
Silver System
MuteClip Double Silver
Gold system
MuteClip
Double Gold
How to soundproof a concrete ceiling
To soundproof a concrete ceiling, you need to use a MuteClip system. Concrete already has a high mass so adding more isn’t going to give you a significant reduction. It is also likely that you are struggling much more with impact noise, than airborne, through a concrete ceiling.

If you can’t soundproof the floor above (treating the source of noise is always ideal), then you need a MuteClip system to decouple and isolate the impact vibrations. These are screwed directly into the concrete ceiling, or, a batten strip ceiling can be created.
If you imagine your ceiling is vibrating with every impact from above, the MuteClip acts as a mini shock absorber between the existing ceiling and the new soundproofing panels. Rather like the suspension springs in your car, the MuteClips will reduce the vibrations able to transfer into your new soundproofing panels. This reduces the noise you hear in the most effective way!
How to soundproof a ceiling with the MuteClip
Step 1
Remove the current ceiling and coving. If there is thermal insulation between joists, this will also need to be removed.
Step 2
Insert acoustic mineral wool sound isolation insulation into the cavities. This will control the drum effect. For concrete ceilings, this is installed after step 3.
Step 3
Screw MuteClips into the wooden joists or battens. If this is a concrete ceiling, MuteClips can be screwed directly into the surface. Add the channel to the clips.
Step 4
Add your soundproofing panels. This may be one layer or three layers of soundproofing boards. These are screwed into the channels and a 2-5mm gap is left around the perimeter of the ceiling.
Step 5
Fill the gap with acoustic sealant. Cover the edges of the soundproofing panels with scrim tapes. Your new soundproof ceiling is now ready for plastering!
How to soundproof a ceiling without removing the original ceiling
To soundproof a ceiling without removing the original ceiling, you must build a batten strip ceiling over it. This is essentially creating a new ceiling below the original. Simply sticking or screwing soundproof materials directly to your original ceiling will not provide a good reduction, so don’t install something under false pretenses!
Soundproofing the existing ceiling from airborne noise – don’t do it!
If the original ceiling is left, the joist cavities cannot be treated with acoustic-grade mineral wool to control the drum effect. We have a lot of people asking how to soundproof a ceiling without removing the existing ceiling, but, this means sounds reverberate inside the open spaces and will amplify the original noise. This is terrible for trying to block airborne noise, so you must take down the existing ceiling to expose the cavities and treat them.
Soundproofing the existing ceiling from impact noise – why it won’t work
To soundproof the existing ceiling from impact noise, you must build a batten strip ceiling over it. You can’t soundproof the existing ceiling directly, because you won’t be able to isolate the vibration energy.
With each audible impact noise, the whole floor above you and the ceiling actually vibrate. Just screwing a layer of soundproofing board onto the ceiling can’t stop this vibration! Instead, you need to use isolation technology to control the energy.
We use a mix of acoustic mineral wool, visco-elastic membranes and MuteClips to decouple a new ceiling and mitigate the transmission of vibrations.
How to soundproof a ceiling without losing space
If you want to know how to soundproof a ceiling without losing head space, then you can use a low-profile MuteClip. This will raise the decoupled ceiling and almost half the original soundproofing system depth. For a room with little head height to lose, the MuteClip LP is the best solution.
The MuteClip LP screws into the side plane of ceiling joists so the soundproofing partition is raised to just below the original ceiling. You’ll benefit from an isolation system that massively reduces airborne noise and will reduce impact noise, too, but retain your room height.
How to soundproof a ceiling with space for pipework
To soundproof a ceiling with space for pipework, or wires, you need to use a MuteClip XP, which will drop the new ceiling lower. This gives you space for pipes in the ceiling or electrics. It also means that uneven beams can be easily leveled!
- Space for pipes in the ceiling
- Space for electrics
- Level uneven ceiling beams
- Decoupled ceiling for maximum soundproofing
Where is your ceiling noise coming from? How to soundproof from mystery sounds!
Knowing where your ceiling noise originates from is so important, as mystery noises might not be coming directly from above! As an example, here’s a little anecdote about a mystery noise transmission in a friend’s home.
I went over one evening to a friend’s new home. While she gave some people the tour, I made drinks downstairs. This was a big Victorian property with thick walls and tall ceilings, yet, I could hear their conversation clear as day downstairs in the kitchen! They had gone to the first floor, on the opposite side of the house to admire some original features of the bathroom and I could hear every word.
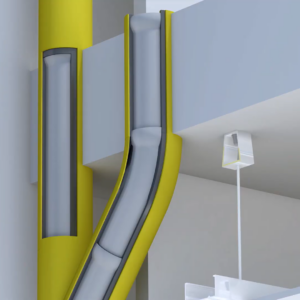
While it would make sense to assume the noise in her house came through the ceiling, I knew it wasn’t possible: they weren’t in the room above me. Instead, I realized the noise was traveling through the downpipe in the corner of the kitchen.
The noise was actually being carried right along the length of the house and down to the floor below with perfect clarity. To soundproof a property like this, we need to address the flanking transmission issue.
Flanking transmission is when sound uses alternative routes and goes under, over or around a partition (wall, floor or ceiling). In this case, the sound was happily traveling along the hollow waste pipe. We soundproof pipes with a mix of visco-elastic membrane and acoustic mineral wool. It comes in one handy material and the pipe wrap is able to damp vibrations so they can’t travel along a material’s length, but also absorb noise so it doesn’t easily radiate out.
Ceiling soundproofing FAQs
When it comes to how to soundproof a ceiling, there are some common queries that need answering! If you still haven’t got your answer, then reach out to us here at iKoustic, and our team with be happy to help you.
Does ceiling soundproofing work?
Yes, ceiling soundproofing works for airborne and impact noise. Make sure you install the correct system for your noise complaint and ceiling type. Issues with ceiling soundproofing arise if you don’t remove your existing ceiling, or, if flanking transmission hasn’t been correctly identified and fixed.
Ceiling soundproofing is a good solution for noisy neighbours and is often used to soundproof flats and apartments. When you have noise from neighbouring tenants above, you should always see if you can soundproof the floor first. Treating noise at the source is the best practice in soundproofing.
Do I need to remove coving to soundproof a ceiling?
Yes, you will need to remove your ceiling coving to soundproof your ceiling. This is because your new ceiling will be slightly lower than the existing ceiling. If coving is not removed, it will no longer be in the right position! We also don’t recommend soundproofing over your original ceiling as you won’t achieve the best results.
To add to this, you will create a route for flanking transmission. This means that sound can short-circuit your new partition through a ‘shortcut’. In this case, the coving touches your original ceiling and the walls. Because sound is a vibration, the vibrations will be able to travel from the original ceiling, through the coving and into your room.
Can I soundproof my existing ceiling?
No, you shouldn’t soundproof your existing ceiling, unless, you create a batten ceiling on top of it (essentially, a second ceiling). Soundproofing directly over your original ceiling means that the cavities cannot be treated (a must in soundproofing), and that vibrations from impact can easily travel downstairs.
How deep is ceiling soundproofing? Will I lose head space in my room?
Ceiling soundproofing starts at 34mm for a direct to timber solution. However, the best soundproofing uses MuteClips and these start at 39mm if you use a MuteClip LP (low profile) to reduce space lost! See how much head height you can lose before planning your budget or any other elements, as space is a non-negotiable variable to work with.
How much is ceiling soundproofing?
It costs £52 per m2 to soundproof a ceiling with our Bronze solution (at the time of writing in 2023). A MuteClip ceiling soundproof system starts at £67 which is a worthwhile investment if you have the space for this.
Which lights are best for a soundproof ceiling?
The best lighting for soundproof ceilings are single wire pendant lights. This is because the more holes you create in your barrier, the more sound can be transmitted through. When a single pendant light is fitted, we use acoustic sealant around the wire which reduces airflow and makes it harder for sound to travel.


